


If you are traveling through Kempegowda International Airport and need to get online, this complete Bangalore airport WiFi guide covers everything — how to connect with an Indian SIM, what to do without a local number, how to extend your session using the BLR Pulse app, and tips to stay connected throughout your time at the airport.
Bangalore Airport WiFi
Quick Information
| Detail | Info |
|---|---|
| WiFi Network Name | BLR_Free_WiFi |
| Free Duration | Up to 2 hours |
| Available In | Both Terminal 1 and Terminal 2 |
| Requires Indian Number | Yes — for OTP verification |
| Without Indian Number | WiFi voucher kiosk at International Arrivals |
| Extended WiFi | Via BLR Pulse App — signup required |
| Paid WiFi | Available at nominal rates after free period |
Is WiFi Free at Bangalore Airport?
Yes, Bangalore Airport offers free WiFi to all passengers across both Terminal 1 and Terminal 2. The network name is BLR_Free_WiFi and it is available throughout the airport including departure areas, arrival halls, and kerbside zones. The free session lasts up to 2 hours per connection. After the free period ends, you can extend your session through the BLR Pulse app.
Method 1 — If You Have a Local or International Roaming SIM
Connecting to Bangalore airport WiFi with an Indian number or an active international roaming SIM is the quickest method. Turn on WiFi on your device and select the BLR_Free_WiFi network. Once connected, open your internet browser — Chrome, Safari, or Edge — and visit any website such as google.com. You will automatically be redirected to the WiFi login page. Select the Local Phone Number option, fill in your mobile number and the required details, and submit. An OTP will be sent to your number. Enter the OTP on the login page and you will be connected instantly.


| Step | What to Do |
|---|---|
| Step 1 | Turn on WiFi and connect to BLR_Free_WiFi |
| Step 2 | Open browser and go to google.com |
| Step 3 | You will be redirected to the WiFi login page |
| Step 4 | Select Local Phone Number option |
| Step 5 | Fill in your mobile number and required details |
| Step 6 | Enter the OTP received on your phone |
| Step 7 | Connected — free for up to 2 hours |
Method 2 — If You Do NOT Have a Local or Roaming SIM
International travelers without an Indian SIM and without international roaming can still access the airport WiFi using a WiFi Voucher. Here is the complete process.
Step 1 — Get Your WiFi Voucher
Locate the WiFi Voucher Kiosk in the International Arrivals area of Terminal 2. At the kiosk, scan the photo page of your passport and your boarding pass. The kiosk will process your details and print a WiFi voucher. If you do not have your boarding pass available, visit the virtual information desk at the airport to get a WiFi PIN instead.
Step 2 — Connect to the WiFi
Once you have your voucher, enable WiFi on your device and select BLR_Free_WiFi. Open your browser and go to google.com. You will be redirected to the WiFi login page. Select the Local Phone Number option on the login page, fill in the required details using the voucher code, and connect.
| Step | What to Do |
|---|---|
| Step 1 | Go to the WiFi Voucher Kiosk at International Arrivals |
| Step 2 | Scan passport photo page and boarding pass at kiosk |
| Step 3 | Collect your printed WiFi voucher |
| Step 4 | Enable WiFi and connect to BLR_Free_WiFi |
| Step 5 | Open browser, go to google.com |
| Step 6 | You will be redirected to WiFi login page |
| Step 7 | Fill in voucher details and connect |
How to Extend WiFi Using the BLR Pulse App
To extend your WiFi service beyond the free 2-hour limit, you need to sign up on the BLR Pulse app — the official airport app by BIAL. The process from the official BIAL images is straightforward and takes only a few minutes.
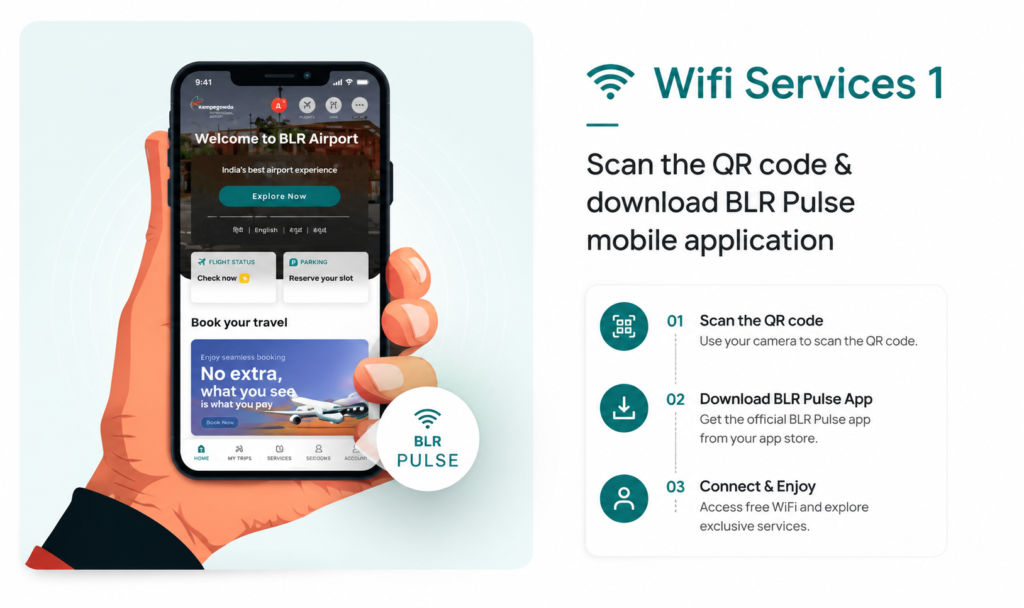
WiFi Services Step 1 — Download BLR Pulse
Scan the QR code available at the airport or search for BLR Pulse on the Apple App Store or Google Play Store. Download and install the official BLR Pulse app on your phone. You can also download it before arriving at the airport to save time.
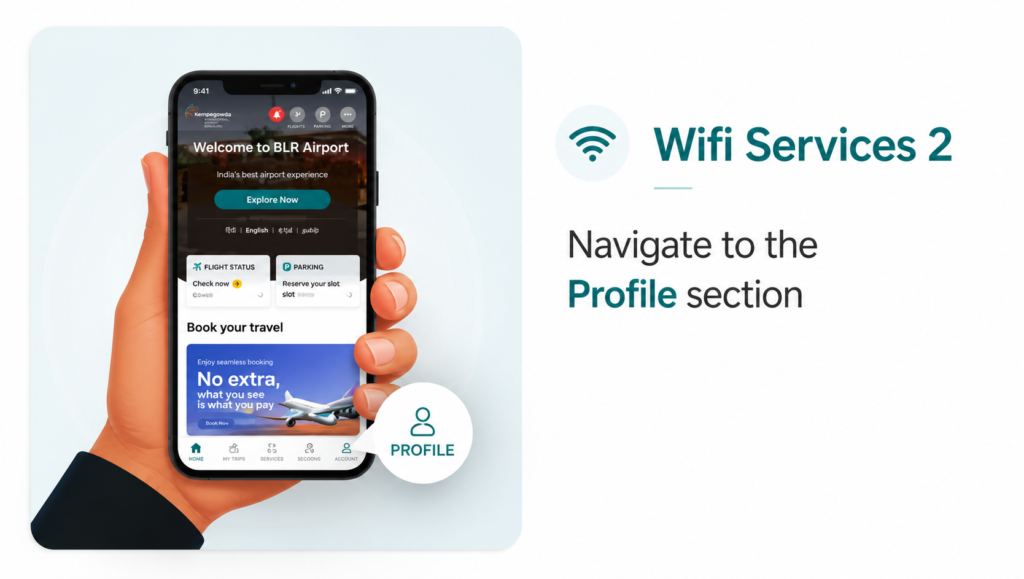
WiFi Services Step 2 — Navigate to Profile Section
Once the app is installed and open, navigate to the Profile section inside the app. This is where you will create your BLR Pulse account which gives you access to extended WiFi and other exclusive airport services.
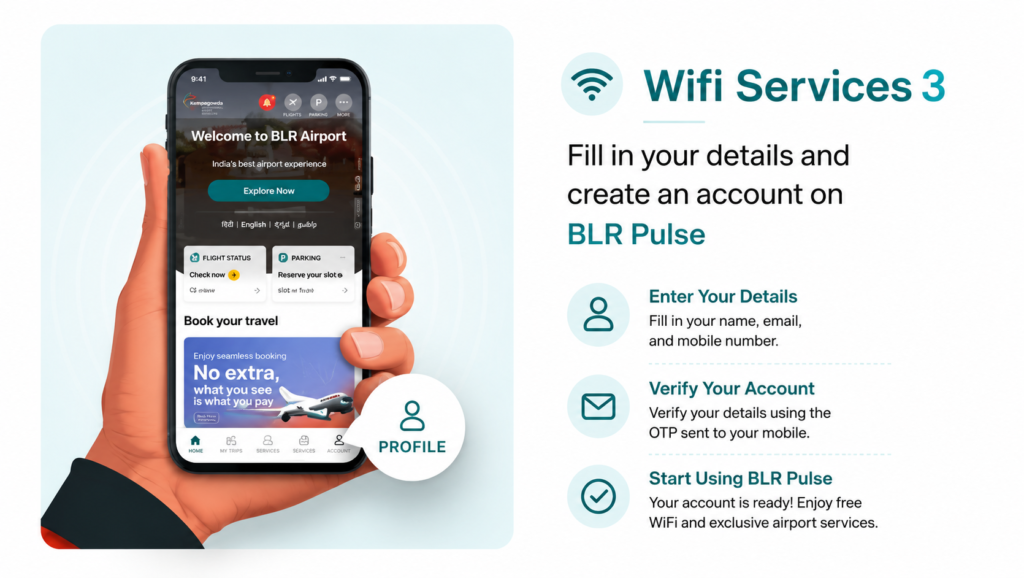
WiFi Services Step 3 — Create Your Account
In the Profile section, fill in your name, email address, and mobile number. Verify your account using the OTP that will be sent to your mobile number. Once verified, your BLR Pulse account is ready and you can access free extended WiFi and all other exclusive airport services directly from the app.
| BLR Pulse Step | What to Do |
|---|---|
| Step 1 | Scan QR code at airport or download BLR Pulse from App Store or Play Store |
| Step 2 | Open app and go to the Profile section |
| Step 3 | Enter your name, email, and mobile number |
| Step 4 | Verify your account using OTP sent to your mobile |
| Step 5 | Account ready — access extended WiFi and airport services |
What Else Can You Do on BLR Pulse
The BLR Pulse app is not just for WiFi extension. Once you have an account, you can use it to check real-time flight status and get notifications, check security queue wait times at entry gates and check-in counters, reserve parking slots before arriving at the airport, browse food and retail options and order food delivered to your gate, book transit hotel rooms or lounges, and navigate inside both T1 and T2 using the built-in WayFinder feature. Downloading the app before your trip makes the entire airport experience significantly smoother.
Tips for Using WiFi at Bangalore Airport
Download and set up the BLR Pulse app before you arrive so you can extend your WiFi session without any delay. If you are an international traveler without roaming, head straight to the WiFi Voucher Kiosk at the International Arrivals area as soon as you land — it takes under two minutes. For security, avoid using public airport WiFi for banking transactions or sensitive logins. Use your mobile data or a VPN if you need to access anything private. If you need a faster and more stable connection, all lounges at both T1 and T2 offer dedicated high-speed WiFi which is significantly better than the general airport network.
Bangalore airport WiFi is free, covers both terminals completely, and is easy to connect to whether you have an Indian SIM or not. With the BLR Pulse app you can extend your session beyond the free 2-hour limit and access a full range of airport services from one place. Set up the app before you travel and you will have no trouble staying connected throughout your time at Kempegowda International Airport.
All WiFi information in this guide is sourced from official BIAL data and verified images from bengaluruairport.com, WiFi services and procedures can change without prior notice. Always check the official Bangalore Airport website at bengaluruairport.com before your travel date to confirm the latest details. DistanceData is an independent travel information website and is not affiliated with BIAL.